A book product includes the different cover types, interior page sizes, and other options related to a yearbook. You must create a book product before assigning a yearbook project to a school. Publishers may have multiple book products to provide different book sizes and cover options to their customers.
TABLE OF CONTENTS
- Adding Book Products
- The General Tab
- The Single Page Tab
- Covers
- Back-Cover Logo Placement
- Spine width option
- Soft Cover Insert & Hard Cover Endsheets
Adding Book Products
To add a new book product, select the Manage Book Products link (A) from the left-side menu. If this is your first time adding a book product, the product list will be empty.

Click on Add Book Product to create a new book product. 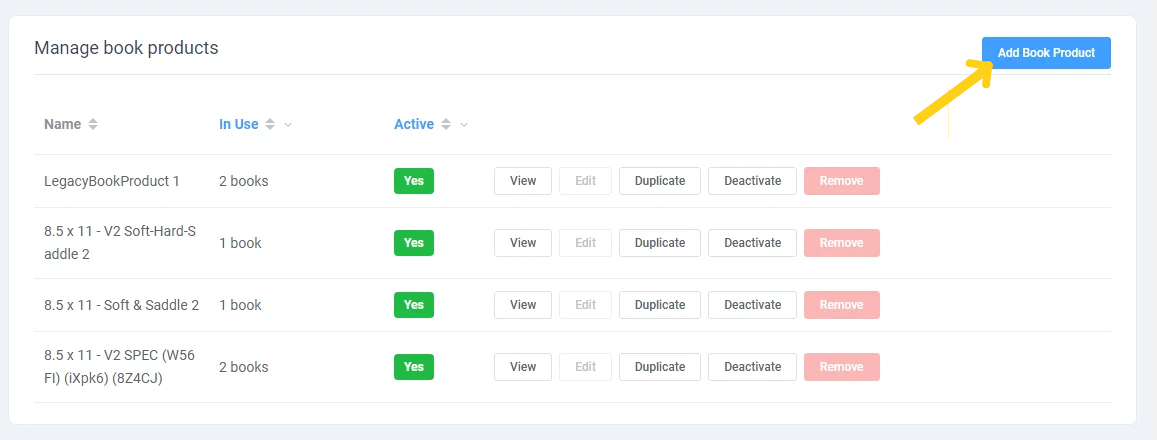
The General Tab
The General Tab is used to define the overall options for the book product.

- The Book Type Name and SKU: Describe the type of book -- product size, cover type(s), page count -- to easily identify the product. (eg. 8.5x11 Hard Cover 100-150 pages). The SKU is a customizable field that can enhance integration with your workflow. This is especially helpful when utilizing the API or generating sales reports.
- Provide the minimum and maximum number of pages for this product. Typically, these values should align with the spine thickness of the cover.
- Indicate if your book should start on the right or left side page (right is the standard).
- Specify the required page multiples (no requirement, 2, or 4) based on your signature formatting. Keep in mind that your clients will be prevented from submitting their books if they don't adhere to your required signature style, and they will be prompted to add or remove pages as necessary.

- Next, set the PDF Render Settings, which defines the DPI (dots per inch) at which the finalized PDF file will be produced. Additionally, specify whether you prefer to receive the interior pages as a single PDF file or as a series of individual one-page PDF files.
- Last, specify the minimum DPI requirements for your books. When a customer adds an image to their canvas (photos, elements, backgrounds) that is not sufficiently large for the usage size, they will see a yellow warning triangle or a red error message, indicating that their image quality is below your threshold. We recommend setting the DPI warning around 200-250 and the DPI error at 150.
The Single Page Tab
Toggle to the Single Page tab to define the size of the book's interior pages. As you enter dimensions into the form, the real-time preview graphic updates.
- First add the width & height of a trimmed page.

- Specify the Bleed Inflate, which is extra padding added to your trim dimensions to ensure edge-to-edge coverage. You can adjust the bleed size on the gutter, edge, top, and bottom to match your printing capabilities.
- Define the Safe Inset, which determines the safe printing area where text or important parts of images should be placed to avoid being cut off. You can adjust the safe inset for the gutter, edge, top, and bottom to match your printing capabilities.

The Final rendered dimensions of your page (including bleed inflate) are displayed at the bottom of this form. The formula used to calculate the dimensions is displays to help you troubleshoot any issues.

Covers
New products display a soft cover tab, but you may add/remove any cover types required. Choose between Soft Cover (eg. Perfect Bound), Hard Cover and Saddle Stitch book products, as well as hard cover endsheets and soft cover inside covers are available. A single book product may have any combination of these cover options.
IMPORTANT: We highly recommend creating book products with all possible cover options from the outset. This allows you to easily add/remove cover types and adjust page counts for your school's projects. 
For each cover type, complete the form in a similar manner as the Single Page form.
Back-Cover Logo Placement
Automatically add your company logo to the back cover of your school's books. The logo cannot be deleted or covered up in the book editor. To add a logo to your schools' books, first toggle the Position option choose a placement on the back cover. If you have uploaded a back cover logo under your publisher dashboard's Customization tab, choose Use Default Cover Logo. Otherwise, upload a different logo (should you maintain different branding for separate product lines).
After choosing the logo, specify the width or height at which the logo should be displayed on the back cover. A DPI warning will let you know if your logo is a suitable resolution at the selected dimensions.
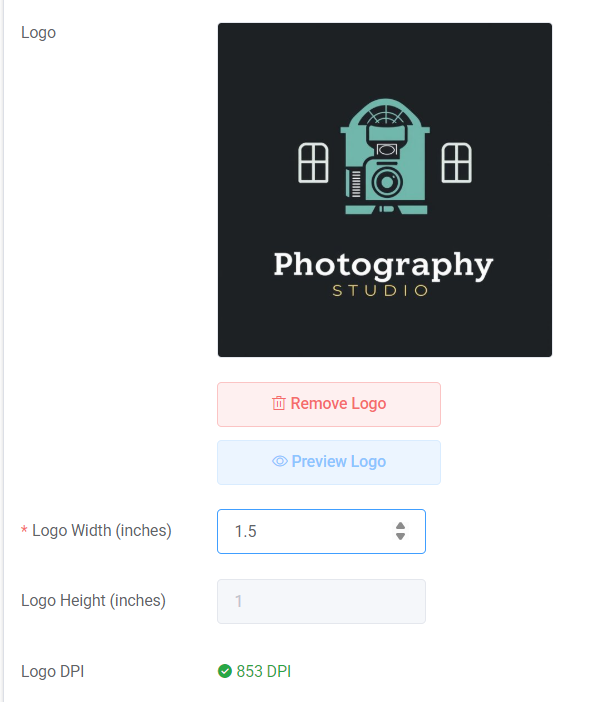
When the product is applied to a book, the logo will appear on the back cover at the indicated size and position. Note that the school cannot cover the logo with images, shapes or text, nor delete or move it.
Spine width option
At the bottom of the cover form, specify the width of the spine area for your cover. Usually, this is particular to a page range, so you may need to create separate book products to correspond with spine width variances.
Soft Cover Insert & Hard Cover Endsheets
If you have added a Soft Cover or Saddle Stitch Cover, you may also include a Soft Cover Insert. This enables your school to design on the left inside front cover and right inside back cover. If you have added a Hard Cover, then you may add a Hard Cover Endsheet, which is a double-page sheet glued to the inside cover extending outwards. Do consult with your printing manufacturer prior to offering these options to ensure they can support this printing option.
Was this article helpful?
That’s Great!
Thank you for your feedback
Sorry! We couldn't be helpful
Thank you for your feedback
Feedback sent
We appreciate your effort and will try to fix the article